TE loader for IDA Pro
The EFI documentation defines a simplified version of the PE32 image format, called “TE”, which is intended to reduce the overheads of the PE/COFF headers. The document in which this format is defined can be found here. Apple’s EFI firmare (or at least one version I was looking at) uses the TE image format for the SEC phase binary, but IDA Pro doesn’t seem to understand TE, so I decided to have a crack at writing a loader to handle TE images. This post describes both a bit about the TE image format, and how to go about writing a basic image loader for IDA Pro in Python.
First, a quick look at the TE image format. It is a stripped down version of PE32, so if you’re familiar with that then you’ll probably recognise these fields. The main image header looks something like this:
typedef struct {
    UINT16                   Signature;
    UINT16                   Machine;
    UINT8                    NumberOfSections;
    UINT8                    Subsystem;
    UINT16                   StrippedSize;
    UINT32                   AddressOfEntryPoint;
    UINT32                   BaseOfCode;
    UINT64                   ImageBase;
    EFI_IMAGE_DATA_DIRECTORY DataDirectory[2];
} TEImageHeader;
With the EFI_IMAGE_DATA_DIRECTORY structure looking like this:
typedef struct {
    UINT32 VirtualAddress;
    UINT32 Size;
} EFI_IMAGE_DATA_DIRECTORY;
Directly following the main header is a set of section headers (NumberOfSections of them, funnily enough) that look like this:
typedef struct{
    char    Name[8];
    int32   VirtualSize;
    int32   VirtualAddress;
    int32   SizeOfRawData;
    int32   PointerToRawData;
    int32   PointerToRelocations;
    int32   PointerToLinenumbers;
    int16   NumberOfRelocations;
    int16   NumberOfLinenumbers;
    int32   Characteristics;
} SectionHeader;
Following the section headers is the data for the sections.
So, the first thing I did was put together a basic template for everybody’s favourite hex editor, 010 Editor, using the structs defined above:
local int32 i;

typedef UBYTE UINT8;

// insert those structs I defined above

struct SectionData (int size) {
    char data[size];
};

TEImageHeader header;
SectionHeader sec_header[header.NumberOfSections];
for (i = 0; i < header.NumberOfSections; i++) {
    SectionData section(sec_header[i].SizeOfRawData);
}
This results in something that looks about right:

The next step was to rewrite it in Python, which went something like this:
import struct
import sys
import os
try:
    from awesome_print import ap as pp
except:
    from pprint import pprint as pp

class TEImage:
    def __init__(self, f):
        self.offset = f.tell()

        # read header
        (self.signature, self.machine, self.num_sections, self.subsystem,
            self.stripped_size, self.entry_point_addr, self.code_base,
            self.image_base) = struct.unpack("<HHBBHLLQ", f.read(24))
        (d1,d2,d3,d4) = struct.unpack("<IIII", f.read(16))
        self.data_dir = [(d1,d2),(d3,d4)]

        # read section table
        self.sections = []
        for i in range(0, self.num_sections):
            self.sections.append(TEImageSection(f))

class TEImageSection:
    def __init__(self, f):
        self.offset = f.tell()

        # read header
        self.name = f.read(8)
        (self.virt_size, self.virt_addr, self.data_size, self.ptr_to_data,
            self.ptr_to_relocs, self.ptr_to_line_nums,
            self.num_relocs, self.num_line_nums,
            self.characteristics) = struct.unpack("<LLLLLLHHL", f.read(32))

if __name__ == '__main__':
    te = TEImage(open(sys.argv[1]))
    pp(te.__dict__)
    for i in range(0, len(te.sections)):
        print "section %i:" % i
        pp(te.sections[i].__dict__)
Pretty self-explanatory - classes for the image and section headers using the struct module to unpack the headers, and the main section just creating an image object from whatever file was passed as the first argument and then prettyprinting the contents of the object.
On my binary the output looks like this:
{
         subsystem: 11,
     stripped_size: 440,
        image_base: 4294965344,
          data_dir: [
    [0] (
      [0] 2048,
      [1] 28
    ),
    [1] (
      [0] 0,
      [1] 0
    )
  ],
  entry_point_addr: 1024,
         code_base: 640,
      num_sections: 5,
            offset: 0,
           machine: 332,
         signature: 23126,
          sections: [
    [0] <__main__.TEImageSection instance at 0x1058d3ab8>,
    [1] <__main__.TEImageSection instance at 0x1058d3b48>,
    [2] <__main__.TEImageSection instance at 0x1058d3b90>,
    [3] <__main__.TEImageSection instance at 0x1058d3bd8>,
    [4] <__main__.TEImageSection instance at 0x1058d3c20>
  ]
}
section 0:
{
              name: .text,
        num_relocs: 0,
   characteristics: 1610612768,
  ptr_to_line_nums: 0,
     num_line_nums: 0,
         virt_addr: 640,
       ptr_to_data: 640,
            offset: 40,
         virt_size: 359,
         data_size: 384,
     ptr_to_relocs: 0
}
section 1:
{
              name: _TEXT_RE,
        num_relocs: 0,
   characteristics: 1610612768,
  ptr_to_line_nums: 0,
     num_line_nums: 0,
         virt_addr: 1024,
       ptr_to_data: 1024,
            offset: 80,
         virt_size: 59,
         data_size: 64,
     ptr_to_relocs: 0
}
section 2:
{
              name: _TEXT_PR,
        num_relocs: 0,
   characteristics: 1610612768,
  ptr_to_line_nums: 0,
     num_line_nums: 0,
         virt_addr: 1088,
       ptr_to_data: 1088,
            offset: 120,
         virt_size: 920,
         data_size: 928,
     ptr_to_relocs: 0
}
section 3:
{
              name: .data,
        num_relocs: 0,
   characteristics: 3221225536,
  ptr_to_line_nums: 0,
     num_line_nums: 0,
         virt_addr: 2016,
       ptr_to_data: 2016,
            offset: 160,
         virt_size: 32,
         data_size: 32,
     ptr_to_relocs: 0
}
section 4:
{
              name: .reloc,
        num_relocs: 0,
   characteristics: 0,
  ptr_to_line_nums: 0,
     num_line_nums: 0,
         virt_addr: 2048,
       ptr_to_data: 2048,
            offset: 200,
         virt_size: 30,
         data_size: 32,
     ptr_to_relocs: 0
}
Not pretty, but it looks like it’s doing the job.
The final stage is to add the IDA loading code. IDA loaders can be implemented as fully fledged plugins with the SDK, or as IDC or IDAPython scripts. I obviously chose the last option, because who wouldn’t? IDA loaders rely on two functions: accept_file() and load_file(). accept_file() is called in every loader when a binary is opened in IDA, to ask the loader if it can load that type of file. All we have to do in this function is check the file’s magic number and make sure it looks like a TE binary:
TE_MAGIC = "VZ"

def accept_file(f, n):
    retval = 0

    if n == 0:
        f.seek(0)
        if f.read(2) == TE_MAGIC:
            retval = "TE executable"

    return retval
The f parameter here is an open file handle, and n is the number of times this loader has been queried so far (not really important for this type of loader). If it looks good, we return the string that will appear in IDA’s “Load a new file” window, otherwise return 0.
load_file() is where the good stuff happens. As the name indicates, this function is called by IDA to actually perform the loading of the file. Hurr.
SECTION_CLASSES = {
    b".text\0\0\0": "CODE",
    b".data\0\0\0": "DATA",
    b".reloc\0\0":  "DATA",
    b"_TEXT_RE":    "CODE",
    b"_TEXT_PR":    "CODE"
}

SECTION_MODES = {
    b"_TEXT_RE":    0,
}

def load_file(f, neflags, format):
    # parse header
    f.seek(0)
    te = TEImage(f)

    # load binary
    for sec in te.sections:
        seg_type = SECTION_CLASSES[sec.name] if sec.name in SECTION_CLASSES.keys() else "DATA"
        seg_mode = SECTION_MODES[sec.name] if sec.name in SECTION_MODES.keys() else 1
        f.file2base(f.tell(), sec.virt_addr, sec.virt_addr + sec.data_size, 1)
        add_segm(0, sec.virt_addr, sec.virt_addr + sec.virt_size, sec.name, seg_type)
        set_segm_addressing(get_segm_by_name(sec.name), seg_mode)

    add_entry(te.entry_point_addr, te.entry_point_addr, "_start", 1)

    return 1
So we first use the classes we built earlier to parse the headers. Then for each section (segment) we need to determine the class (ie. whether it’s data or code or relocations or whatever), and the addressing mode (this is important because the entry point will be in 16-bit mode). Call file2base() to read the section’s data into IDA at the virtual address specified in the section header, add_segm() to create a segment of the appropriate type at this virtual address, and set_segm_addressing() to mark the segment as 16-bit if necessary. Once we’ve added all the segments into IDA we mark the entry point, and return 1 to tell IDA all is well.
To install the loader, I just symlinked it into IDA’s loaders directory. On OS X this is actually inside the application bundle at idaq.app/Contents/MacOS/loaders/ (idaq64.app looks inside idaq.app as well).
Now when we open IDA and drop in our TE binary we get some good news:

The binary is processed and the .text segment looks OK:

And here’s the entry point in 16-bit mode, the first bit of code executed by the CPU when you power on the Mac:
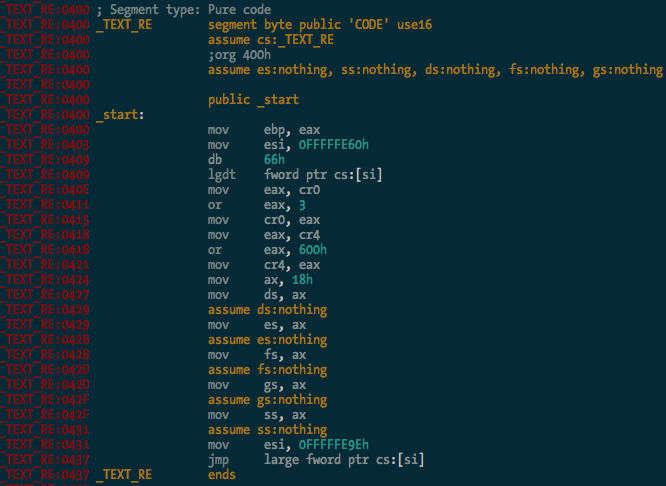
You can see it there loading the GDT, and enabling protected mode and SSE extensions before carrying on with the rest of the CPU init stuff. Good times.
So there you go - a simple binary loader for IDA Pro in Python. I haven’t bothered implementing relocation fixups and whatnot yet, but I probably will at some stage. It’s 2:41am and I’m tired. The source code is in the ida-efiutils package on Github.
IDA Pro scripts for EFI reversing
Reverse engineering EFI executables is a bit of a pain in the arse due to the way linking works with EFI. All EFI executables are statically linked, and there is no dynamic linking/loading in the traditional sense. Much of the core EFI functionality is exposed through several “tables” - the System Table, Boot Services Table and Runtime Services Table. These are just structs containing a bunch of pointers to functions and data that are accessed by executables running in the EFI environment. I won’t go further into the details of the tables - if you’re reading this you’re probably well across it already, but if not, check out the EFI spec.
When an EFI binary is executed by the DXE or BDS phase of boot, the binary is just loaded into memory and the entry point is called like any other function. The EFI System Table is passed as a parameter to the entry point function, along with a reference to the Image Handle, and the Boot Services and Runtime Services tables are retrieved from the System Table. From here, EFI functionality is accessed from within the executable by making calls to function pointers in the various tables - for example, the Boot Services function AllocatePool() for allocating memory on the heap.
Since there are no references in the binary to external symbols, reversing an EFI binary becomes a bit more difficult. Calling a Boot Services function might look like this:
mov     rax, cs:qword_whatever
call    qword ptr [rax+150h]
Not particularly useful. What we want to see is something more like this:
mov     rax, cs:gBootServices
call    [rax+EFI_BOOT_SERVICES.UninstallMultipleProtocolInterfaces]
Manually changing all the references to EFI tables into struct offsets is painful, so I’ve written some IDAPython code to make it a bit easier. The Github repo is here.
The first task is finding global variables where the various EFI tables are stored. This can be done (for the few binaries I’ve tested with) by the rename_tables() function in efiutils.py. Once that’s done, the update_structs() function will find xrefs to these globals and rename any references to these structures.
Before running the script, one binary (a free hug to the first person to tell me what it is) looked like this:

After, something much more useful:
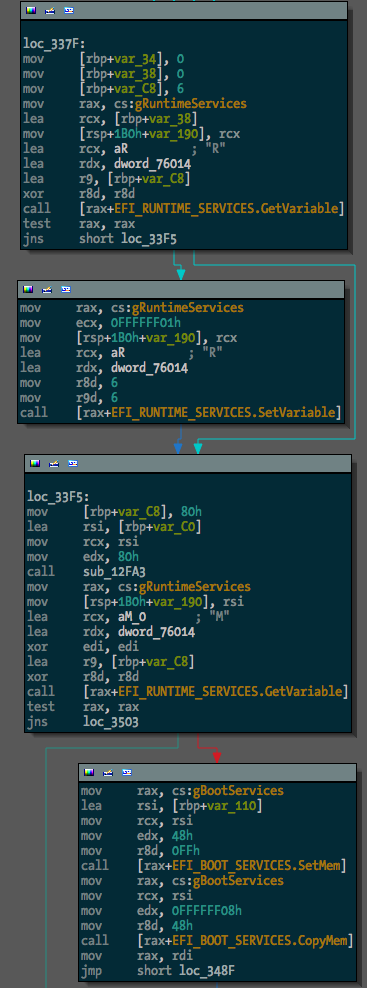
The next step in making EFI reversing easier is going to be locating and renaming function pointers within EFI protocol blocks. I guess I’ll get to it.
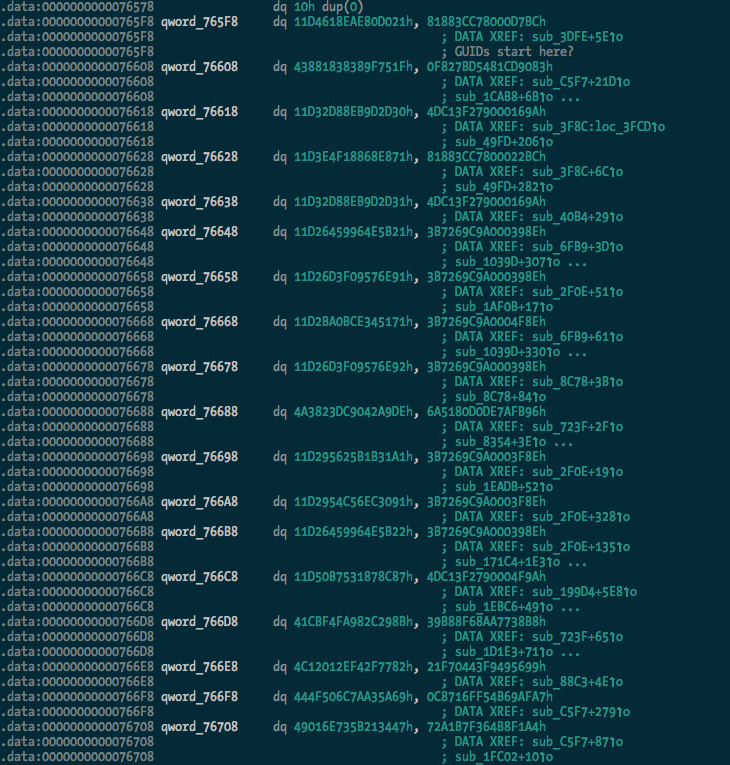
Update: OK, I’ve added searching for and renaming of GUIDs with the rename_guids() function.
Before:
After:
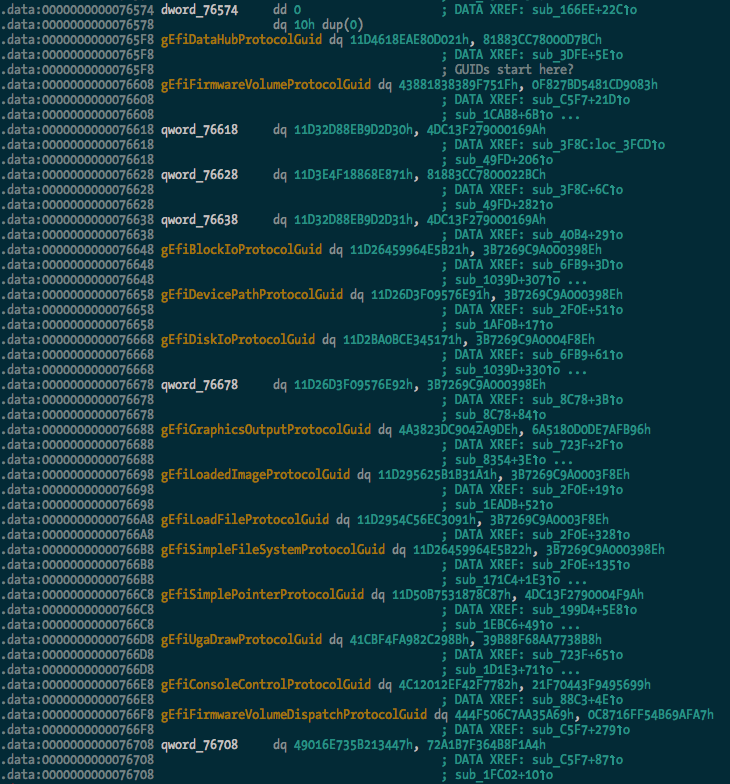
And we can see some of the protocol usage starting to take shape:
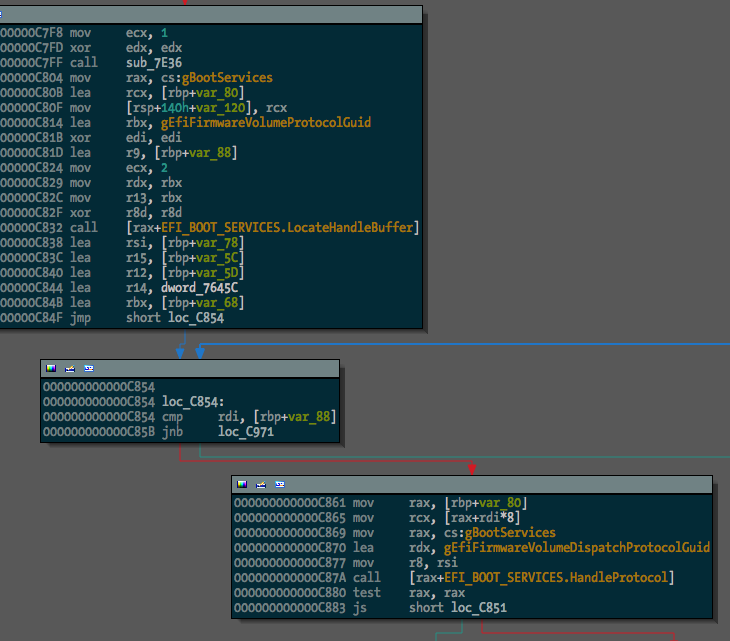
I extracted a pretty large list of guids (470 of them) from the TianoCore source, which should be found and renamed in any data(ish) segment in the binary.
Carving up EFI fat binaries
Apple uses a custom fat binary format so their EFI applications can contain both 32-bit and 64-bit sections. IDA Pro isn’t too keen on this format, and (last time I looked) won’t disassemble them unless you specify the starting offset for the architecture section you want to disassemble.
The format is just a header that looks like this:
typedef struct {
    UINT32 magic;               // Apple EFI fat binary magic number (0x0ef1fab9)
    UINT32 num_archs;           // number of architectures
    EFIFatArchHeader archs[];   // architecture headers
} EFIFatHeader;
Followed by some architecture headers that look like this:
typedef struct {
    UINT32 cpu_type;    // probably 0x07 (CPU_TYPE_X86) or 0x01000007 (CPU_TYPE_X86_64)
    UINT32 cpu_subtype; // probably 3 (CPU_SUBTYPE_I386_ALL)
    UINT32 offset;      // offset to beginning of architecture section
    UINT32 size;        // size of arch section
    UINT32 align;       // alignment
} EFIFatArchHeader;
Followed by the data for the sections.
I wrote a quick bit of python early last year to parse the headers and split the fat binaries into their single architecture sections and thought someone might find it useful. It’s on my github. I’ve got a couple of other half finished EFI-related scripts that I’ll add to that repo soon, when they are a bit more useful.
Running efi_lipo.py:
$ ./efi_lipo.py SmcFlasher.efi
processing 'SmcFlasher.efi'
this is an EFI fat binary with 2 architectures
architecture 0 (X86):
  offset: 0x30
  size:   0x8bd0
architecture 1 (X64):
  offset: 0x8c00
  size:   0x9e70
saving X86 section to 'SmcFlasher.efi.X86'
saving X64 section to 'SmcFlasher.efi.X64'
It might have been better to write an IDA Python script to do it instead, maybe I’ll do that at some stage, but this does the job for now.
The rEFIt site has some good info on the data structure layout, as does awkwardTV.

